Friday, July 29, 2016

We Three Kings

We Three Kings - this week we're creating in multiples of THREE.

That means create a card with THREE of one element … three circles, three reindeer, three packages under the tree … you get the picture.

Here are our triple-play creations:


Stephanie says, "I designed my card around THREE rectangles cut from designer paper ... each containing a holiday icon.  For some bonus points, I also included a brad with a THREE word sentiment and three snowflakes above my Santa."


Lauren says, "I chose to build my card around three tiny trees, diecut from three tiny scraps of patterned paper. Once I had them ready to inhabit a card, Week #422 at Sketch Saturday helped me determine their placement and accoutrements."

Link your "We Three Kings" cards here by 6pm (EST) on Wednesday, August 10th. Keyword for galleries and Flickr is JB:16:16.

Thursday, July 28, 2016

Sketch-O-Licious

As always, we were spoilt for choice when it came to only picking THREE sketch cards to feature since every single link in the gallery is perfection! Here are a few especially fab examples that really caught our eye:

...makes the point that red and green ALWAYS look good on a Christmas card, and --just like we thought-- the larger circle on the sketch was absolutely crying out for a *DOILY*!!! :)

...proved that (paradoxically!) UGLY sweaters can make for beautiful holiday cards! ;)

...reminds us that the RESIST technique is almost always irresistible; and that we don't play along with the wonderful Sisterhood of Snarky Stampers nearly as often as we ought to! :0

Many thanks to everyone who played along, we looooooooooooove to see your amazing creations! We'll be back at midnight with a brand new challenge

Friday, July 22, 2016

Sketch-ing in a Winter Wonderland

We're still making cards based on Stephanie's wonderful sketch. Won't you join us? Scroll down to the original post for full details and to link up your own gorgeous holiday cards.


Meanwhile, here's what we made this week:


Lauren says, "My card this week is definitely A looser version of the sketch, but i hope you can still see the bones? i've played with the proportions a bit, and added the pennant mat (found in my "scraps" bin and promptly re-fallen in love with) but all the basic bits are really there, honest! As an added bonus, my card is almost entirely red, white and pink... which coincidentally would be the colors of the flag if I ever founded my own country!"


Stephanie says, "When I created the sketch, I thought about a doily for the circular element.  Instead of a rectangle, I used a Holiday Gift Die Cut and accented the design with gold sequins.  The sentiment circle is a favorite from Catslife Press."

Friday, July 15, 2016

Merry Sketch-mas

How is it possible that we're already halfway through our ♥JINGLE BELLES♥ year without the treat of a lovely sketch challenge from our resident sketch artist, Stephanie Severin?? Well, we don't quite know how that happened, but we're prepared to fix it right now:


Of course as always we're all about the inspiration, so you can flip, rotate, stretch, shrink, change shapes, or generally use this roadmap in any way you like to jumpstart your creativity. Here's what we made this week:


Stephanie says, "With the repeating circles in the design, I decided to make holiday ornaments my focal point.  I built my card around the glittery ornament gift tag using papers from four different collections (including glittery green from some Halloween papers).  I finished with sticker sentiments & sequins."


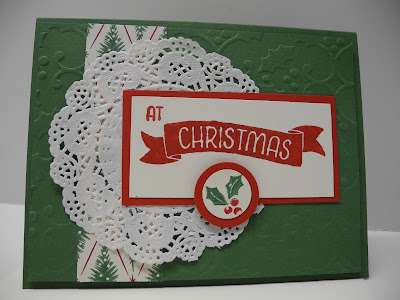
Lauren says, "I love sketches generally, Stephanie's sketches particularly, and this sketch especially, because as soon as I saw it I immediately started thinking about which of my stash items would fit in the various shapes. My first thought was, "Ribbon, doily, postcard, flower!" ...and I got everything right except the ribbon, lol, which I later swapped out for a punched paper strip that matched better. Oh and I rotated the sketch ninety degrees clockwise, when the vintage postcard I chose to scan and resize turned out to be tall instead of wide."

Now it's your turn to pull out you favorite go-to ingredients and get creating using Stephanie's fabulous sketch. Link up here by 6pm (EST) on Wednesday, July 27th. Keyword for galleries and Flickr is JB:16-15.

Thursday, July 14, 2016

Out-of-this-World Ombre

We loved all of the different ways you were inspired by our Ombre Christmas Tree.

Here are a few of our favorites:


used her inks to create a glowing ombre sky, which really pops with her white holiday tree ... and the icing on the cake is that awesome doodled frame.


Lorraine 
at

used stickers from the $1 Store to create her own amazing ombre bauble tree ...
merry & bright fore sure.


Marianne
of

made three gorgeous rainbow cards (click through to see the other two) ... we loved the ethereal effect of her gorgeous watercolory inky wash.

See you at midnight for another *sketchy* inspiration.

Friday, July 8, 2016

Colorful Christmas

This week we're still creating cards inspired by this gorgeous holiday scene.


Here are our inspired creations:

Lauren says, "Yep, I got out the Color Burst pigment powders again, this time i've added some H2O and used them to watercolor a background inspired by the luscious rainbow ombre tree in the photo. Since it's quite a busy painting, I didn't add much in the way of embellishment, just a layered diecut snowflake... and plenty of bling. Because bling is ALWAYS a good addition, imo!"


Stephanie says,"I got a new Tim Holtz Stencil that reminded me of the Christmas ornaments, so I used it with silver metallic ink on a black card base.  Then I hand-cut triangles from designer papers to create the different sections of color for my tree.  I finished by decorating with silver glitter enamel dots and a gem for a star (both from Eyelet Outlet)."

Remember, you have until Wednesday at 6pm EST to link-up your inspired card at the original post.

Friday, July 1, 2016

Ombre Colors of Christmas

This week we're bringing you an inspiration photo to kick-start your Christmas creativity.

You may decide to go with an Ombre color palette ... or pops of color with lots of white ... or even be inspired by that cute little house sitting on the shelves ... just make sure and let us know how the photo inspired your design.


Here is how we were inspired:


Stephanie says, "I'm often a bit of a *literalist* when it comes to inspiration photos.  I sponged four colors of Distress Ink onto cardstock (overlapping the hues to create the transition colors) and then die-cut my tree.  I splattered lots of water to create a bokeh-like effect with the inks and then decorated my tree by covering it with Clear Swirl Bling from Eyelet Outlet.  I added the wood panel to bring in the texture of the island and blinds using a Sketch from The Paper Players."


Lauren says, "I can be fairly literal, too, but in my case the aspect of the photo that really caught my attention was the dramatic rainbow of baubles, so I decided to make some of my own and arrange them in a sort of cascade. I traced a few sizes of circle template onto scraps of watercolor paper painted with different shades of Color Burst Pigment Powders mixed with water. Then I stenciled a bit of white modeling paste onto each bauble. They make a bold statement, so I finished the card with a couple of mats, including a luscious dark wood grain paper which resembles the furniture in the background of the inspiration pic."


We can't wait to see how you're inspired by the photo.  Link your cards here by 6pm (EST) on Wednesday, July 13th.  Keyword for galleries & Flickr is JB:16:14.